


Anytime you wanna supercharge your businesses by implementing a new tool, you are bound to have some questions on the best way to transition. Those questions can be overwhelming at first, but I promise a little investment in time to learn it right from the jump is oh-so worth it!
When I first started using HoneyBook, I found that there were a couple of things I needed to better understand before diving in. Mostly? I wasn’t sure what different features were and how they applied to me and MY business. Plus, I wanted to understand how those features could be utilized to best fit my current process and how to make my set-up as simple and streamlined as possible — for me and my clients both.
Whether you’ve built your own process from scratch or have used another tool to help you define the steps in your process, you likely know there are several terms that can be used to describe the same thing. For example: a quote, brochure, pricing guide, bid, and catalog can all be used for a list of services. In order to understand how your process will fit into HoneyBook, it’s helpful to first familiarize yourself with their language.
HoneyBook Vocabulary & What You Need to Know
When you become a HoneyBook user, here are some of the main terms you’ll see:
- Project: A project is your digital workspace for everything related to a particular job/event/project. When you receive a new lead, you will always begin by creating a Project. There you will always be able to access details about the project and client, send emails, and send files for your client to interact with.
- Project Pipeline: Your Project Pipeline is your dashboard for all projects, and it gives you a bird’s eye view of where each Project stands in your process. The dashboard is made up of various stages that your Projects will be categorized based on where they are in their lifecycle with you.
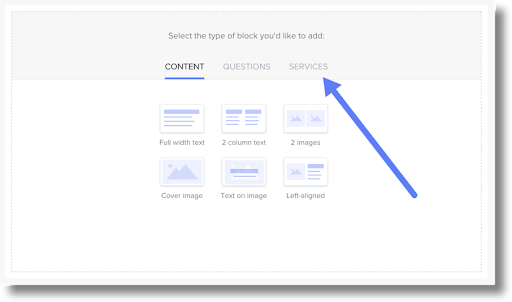
- Brochure: A Brochure in HoneyBook is a customizable file that allows you to share your pricing and services for clients to review. Because the brochure is interactive, it will allow your clients to select the package or services that they’re interested in, and submit their choices from right within the file.
- Proposal: Proposals are your one-stop-shop for booking a client. Instead of sending a contract and invoice separately, you can send a Proposal, a file that combines an Invoice and a Contract. This expedites your booking process and allows your client to quickly review, sign, and pay, all from one document!
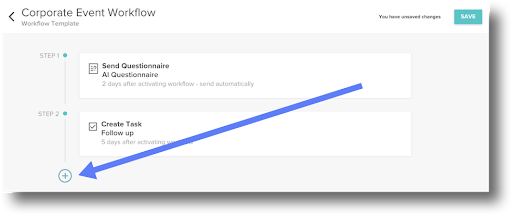
- Workflow: Otherwise known as automations! Workflows allow you to automate tasks in your Project’s lifecycle. You can automatically send out emails or certain file types at the appropriate predetermined time without lifting a finger. They can even be automatically triggered via the Contact Form or applied individually to Projects.
Once I had a better understanding of the tools I had at my disposal, I was able to figure out how they worked together to fit how I serve my clients. I’ll talk about the way I have my process set up in HoneyBook, but you can play around with these steps to make them fit the way you like to do things!
Setting up a process in HoneyBook:
So today we’re talking specifically about setting up a process in HoneyBook, and the steps you need to take to communicate with and eventually book a client using the platform!
Step 1: Adding a client project into HoneyBook.
There are a couple of ways new potential clients can be added to HoneyBook.
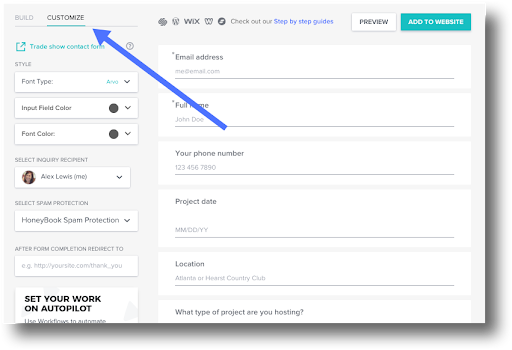
First, I recommend adding the HoneyBook contact form to your website! New submissions are automatically added to HoneyBook as a project for me, saving me all the manual work I was doing before. All of my clients’ information is captured under the project details, and I can always go back and make changes to those later.
Note: I also recommend adding your direct link on social media! This allows you to share your form without any embedding necessary and is a great way to get the info you need from folks who slide into your DM’s.
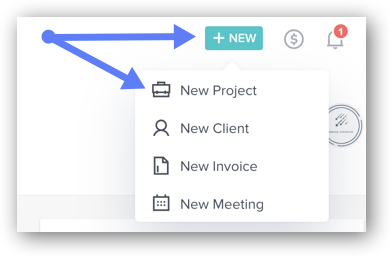
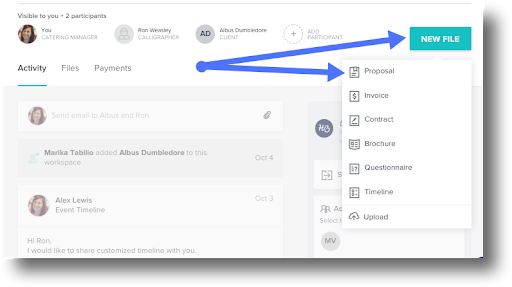
Second, if you’re anything like me, you’re still going to have some clients reach out directly who haven’t filled out your contact form. You can manually add those inquiries in by clicking the +NEW button in the top right-hand corner of your account!
Note: Check out HoneyBook’s Chrome Extension. If a new inquiry comes in via email, you can add them to HoneyBook without having to leave your inbox!
Once new projects have been added, the project pipeline is your official new BFF! This is a dashboard that gives you a bird’s eye view of where all your projects currently stand, from first inquiry to project completion. I live on this dashboard so I am always up to date on where all my projects are in my process.
Step 2: Following up with a potential client.
The first step in following up is asking yourself, “How do I prefer to follow up with my new inquiries?” Do you like to send an email to introduce yourself, or do you prefer to schedule a call? Do you like to send them a pricing document to review your services, or do you prefer to ask them some questions and get more details?
It’s super important to me that new inquiries get followed up with quickly, but I always want my replies to feel personal. That’s why having templates set up in HoneyBook comes in handy!
Send an email:
The faster you respond, the more likely you are to book that client. What’s great is it’s super easy to add your personalized email templates into HoneyBook, so you don’t have to write the same intro over and over. This has helped me in replying to new inquiries quickly. All I have to do is go to their project, pop in the email template, maybe make a couple of customizations to make it that much more personal, and send.
Pssst! Sign up with my link below and get 5 of my custom email templates for free!
Schedule a call:
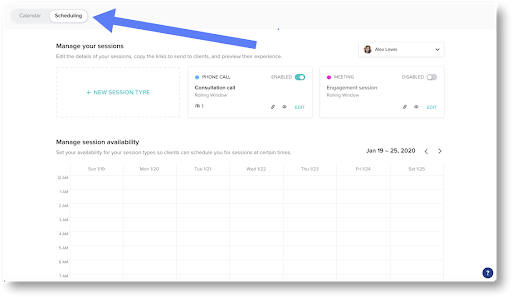
Meeting face-to-face on Google Hangouts with a new potential client is a great opportunity to build a relationship and establish if there’s a mutual fit. HoneyBook’s scheduling tool saves me so much back and forth. All I do is pre-set my availability and pop in my custom meeting link to my email. My potential clients select a time that works for them and get confirmation and reminders automatically.
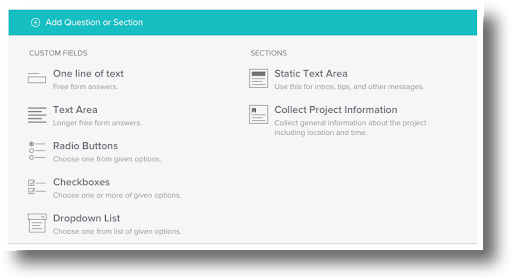
Send a questionnaire:
Sometimes, I need a little more information about a potential client and what their needs are, so using a questionnaire is perfect for me. I love it when inquiries come through my contact form, but we all know that they can come in from social media, direct email, and even text, and often only provide basic details. Once their project is added to HoneyBook, I have my questionnaire sent automatically (check out workflows below!). That way I can make sure we’re a good fit for each other quickly.
Send a brochure:
Brochures are such a wonderful way for me to present myself and my services to my clients. I have multiple brochures depending on the services my clients are interested in. For example, I share my wedding brochure with a potential wedding client and my portrait brochure with a potential portrait client. That way each client only sees my relevant services and pricing and can easily make their selections!
Step 3: Book your client!
So you’ve added your client into HoneyBook and you’ve followed up with them appropriately. You’ll probably find (as I did), that this speedy yet personalized and professional communication sets you apart, and it doesn’t stop there!
When it’s time to book, sending a contract and invoice can be a lengthy process for you and your clients. I used to send a contract and invoice separately, and sometimes I would receive a signed contract but no payment, or vice versa. Enter: the HoneyBook proposal file, to the rescue!
The proposal merges these two steps by combining the contract and invoice into one file! I just insert my template, review the payment schedule and contract, make adjustments where needed, and send. An added bonus? If I’ve sent my potential client a brochure, their selections will automatically be added to a proposal so all I have to do is review and send it off!
When a client receives my proposal, they can review the services, sign their contract, and submit their payment … all in one place! This has saved me so much time and makes booking so easy for my clients. It used to take me hours to put together a contract and invoice, but it only takes me a few minutes with HoneyBook!
Bonus (that will save you hours!)
With all the things you have on your to-do list for every client and project, every bit of automation can help. HoneyBook workflows have allowed me to automate the steps I want, while still giving me complete control where I need it.
These workflows help me with everything from automating my first replies, to staying on top of editing shoots, so I have one place to check for my daily tasks.
For example, I always like to send a check-in message a month before my bride’s wedding and then a questionnaire 2 weeks before to finalize details. Because I had set up my email and questionnaire templates in HoneyBook, I was able to apply those templates to my workflow. All I have to do now is apply the workflow to my bride’s project, and it automatically schedules my email and questionnaire to send to my bride on the appropriate dates!
Automating steps in my process give me so much peace of mind and has freed up an incredible amount of mental space so I can focus on dreaming up other areas to grow my business.
There you have it!
With a little better understanding of the HoneyBook tools and how they work together, you are ready to get booked quickly and efficiently. It might take some time and effort to get all settled in at first, but I promise it’s worth it! With my help and the help of the incredible HoneyBook team, you’ll be there in no time!
(PS. Check out our last HoneyBook tutorial here all about streamlining workflows!)
This post is in partnership with HoneyBook, my small business obsession, righthand helper for many years, and a tool that I firmly believe can help ALL small business owners.
Interested in streamlining your small business with HoneyBook?
Get my 5 email templates, plus a free trial and 50% off your annual subscription here!


")


[…] Pinterest […]